Sponsored
Glaze by Raycast
Desktop apps, reimagined by you. Create software for you and your team — it lives on your Mac and connects to your files, tools, and hardware.
Learn More →ShazamKit makes it easy to add music recognition to your iOS apps. The first version of this framework was introduced at WWDC 2021. It was a bit complicated: working with AVAudioEngine and streaming buffers, getting results via SHSessionDelegate. Since iOS 17, ShazamKit has been simplified and now works with modern concurrency. In this guide, you'll learn how to set up ShazamKit, recognize songs, and manage a library of identified tracks.
Preparation
Before importing the framework, you'll need to enable the ShazamKit service. In Certificates, Identifiers & Profiles, select the ShazamKit checkbox in the App Services section.
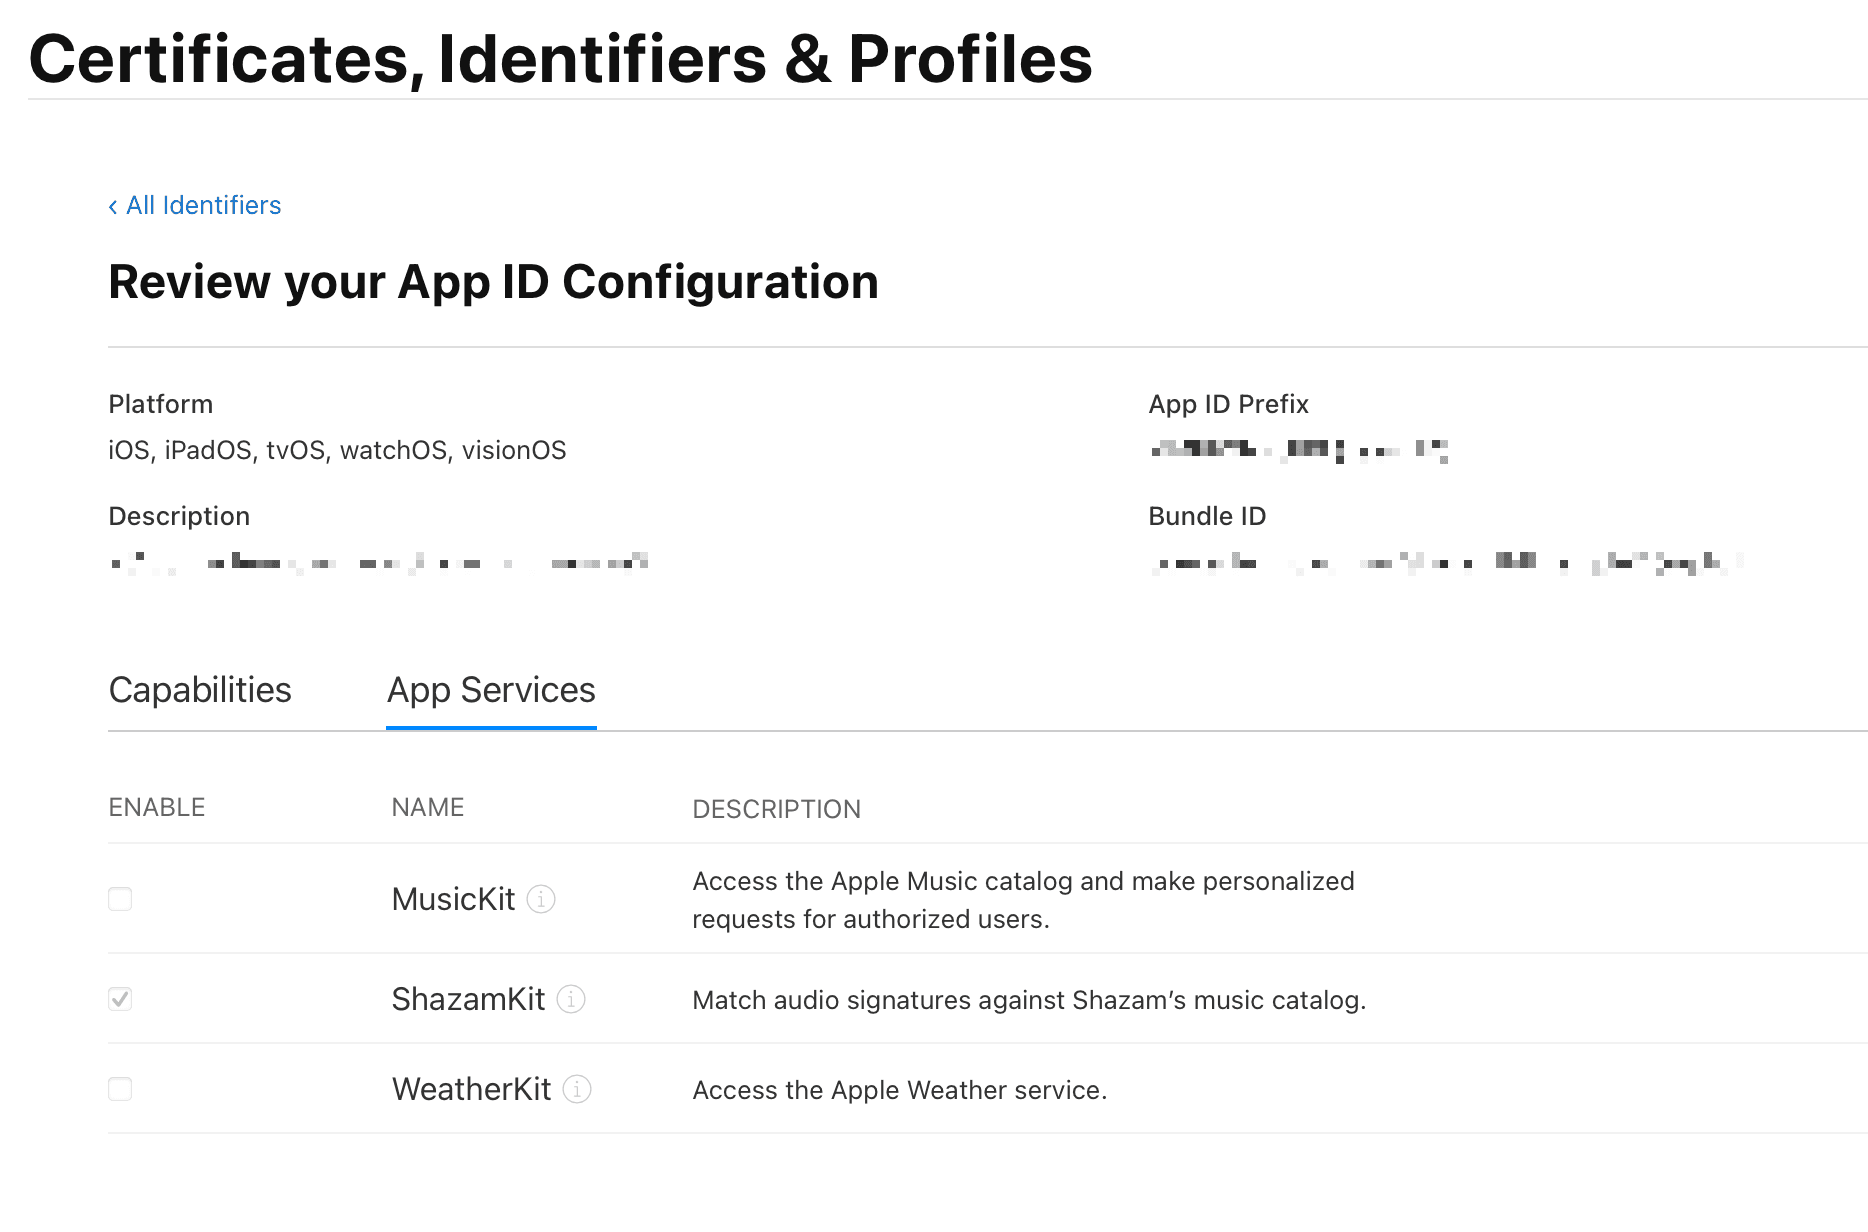
In case the service is missing, you'll get an error: The operation couldn't be completed. (com.apple.ShazamKit error 202.)
For working with a microphone, you need to add the NSMicrophoneUsageDescription key to the Info.plist file.
Music recognition
Let's create a simple app that recognizes music and shows a list of recognized songs. First, we need to create a ShazamView with a ShazamViewModel:
import SwiftUI

struct ShazamView: View {

    @StateObject private var viewModel: ShazamViewModel = .init()

    var body: some View {
        NavigationStack {
            VStack {
              shazamButton
            }
            .navigationTitle("Songs")
        }
    }

    private var shazamButton: some View {
        Button(action: match) {
            Image(systemName: "shazam.logo.fill")
                .resizable()
                .frame(width: 52, height: 52)
        }
    }

    private func match() {
        Task {
            await viewModel.match()
        }
    }
}

import ShazamKit

@MainActor
final class ShazamViewModel: ObservableObject {

    func match() async {
        // Matching
    }
}SF Symbols contains two Shazam icons — shazam.logo and shazam.logo.fill
There are two classes that we'll use:
SHManagedSessionfor matching audio with audio catalog;SHLibraryfor managing the user's Shazam library.
By default, SHManagedSession uses Shazam catalog. It can be customized with SHCustomCatalog for custom audio recognition. To learn more, watch the Create custom catalogs at scale with ShazamKit session from WWDC 2022.
We'll create a SHManagedSession instance in the ShazamViewModel and call the prepare function. It increases the responsiveness of matches:
@MainActor
final class ShazamViewModel: ObservableObject {

    @Published var managedSession: SHManagedSession = .init()

    init() {
        Task { @MainActor in
            await managedSession.prepare()
        }
    }
}
Calling this function automatically requests permission to use the microphone.
SHManagedSession allows two ways to get the result:
- A single match via
result(); - An async sequence of matches via
results(). The session will continue to match audio until it's canceled.
We'll use the first one:
func match() async {
    let result = await managedSession.result()
    managedSession.cancel()
    switch result {
    case .match(let match):
        print(match.mediaItems.first)
    case .noMatch(_):
        print("No match")
    case .error(let error, _):
        print(error.localizedDescription)
    }
}
After getting the result, we cancel the session and print values from SHSession.Result enum cases.
match.mediaItems is an SHMatchedMediaItem array. Each item contains metadata about recognized song like title, artist, artwork, etc.
These items are related to the current recognized audio. We also can get a history of recognized songs via SHLibrary and update it.
Working with history
SHLibrary allows us to add, remove, and get media items from previous app sessions. We'll add the recognized song to the library:
@Published var library: SHLibrary = .default

func match() async {
    let result = await managedSession.result()
    managedSession.cancel()
    switch result {
    case .match(let match):
        if let mediaItem = match.mediaItems.first {
            try? await library.addItems([mediaItem])
        }
    case .noMatch(_):
        print("Mo match")
    case .error(let error, _):
        print(error.localizedDescription)
    }
}
Adding and removing items also affect the library in Shazam app.
SHLibrary conforms to the Observable protocol, so we can observe changes in the library and show them in the interface:
struct ShazamView: View {

    @StateObject private var viewModel: ShazamViewModel = .init()

    var body: some View {
        NavigationStack {
            VStack {
                List {
                    ForEach(viewModel.library.items) { mediaItem in
                        // Media item view
                    }
                }
                shazamButton
            }
            .navigationTitle("Songs")
        }
    }
}
Let's create a MediaItemView to show a metadata:
import SwiftUI
import ShazamKit
struct MediaItemView: View {
let mediaItem: SHMediaItem
var body: some View {
HStack {
AsyncImage(url: mediaItem.artworkURL) { image in
image.resizable()
} placeholder: {
Color.secondary
}
.frame(width: 100, height: 100, alignment: .center)
.cornerRadius(8)
VStack(alignment: .leading) {
Text(mediaItem.title ?? "Unknown track")
.font(.headline)
Text(mediaItem.artist ?? "Unknown artist")
.font(.body)
if let creationDate = mediaItem.creationDate {
Text(creationDate.formatted())
.font(.caption)
.foregroundStyle(.secondary)
}
}
}
}
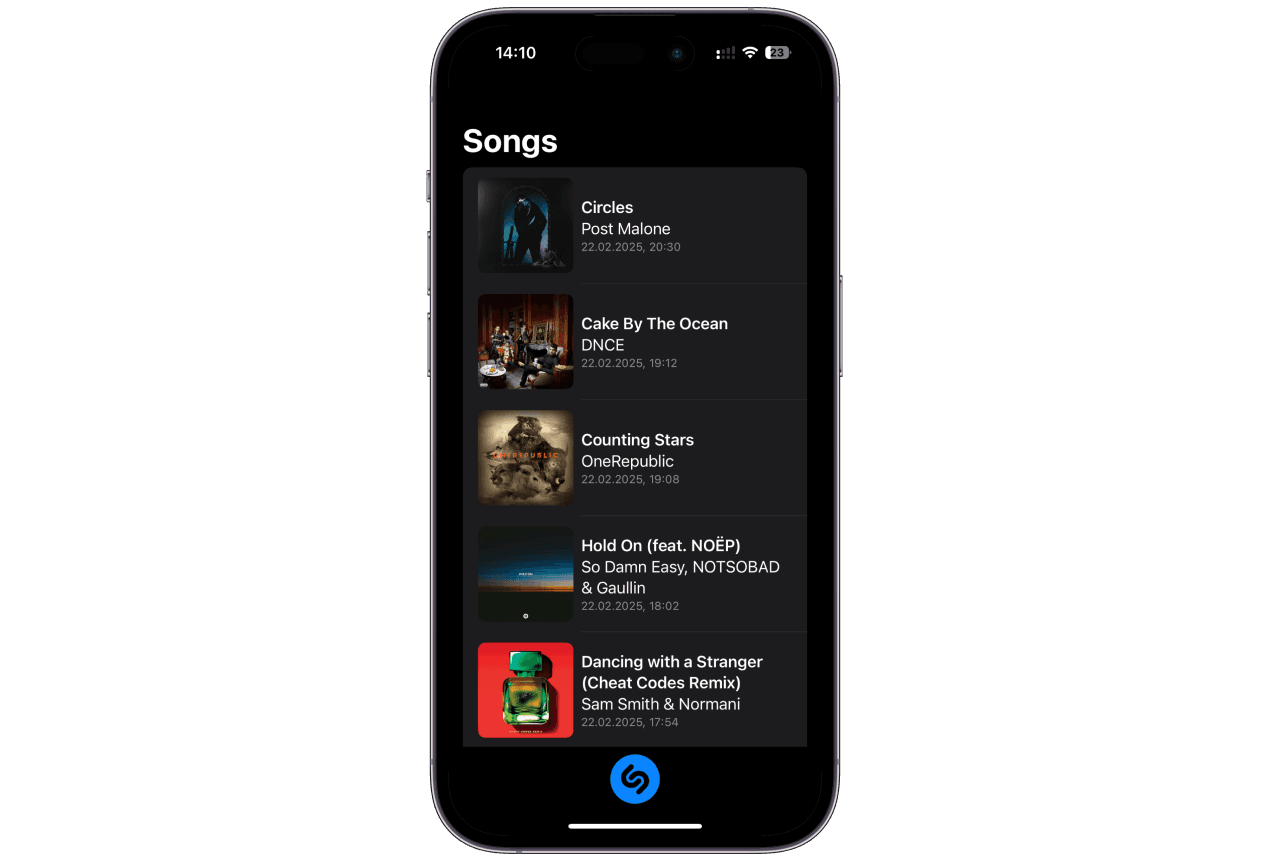
}Here we show the artwork, title, artist, and creation date of the media item. To use the view, we need update ShazamView:
List {
    ForEach(viewModel.library.items) { mediaItem in
        MediaItemView(mediaItem: mediaItem)
    }
}
Here is a result:
Adding context menu
To make the example more useful, let's add a context menu to open the recognized song in popular music services and share it:
struct MediaItemView: View {

    let mediaItem: SHMediaItem
    let removeAction: () -> Void
    @Environment(\.openURL) private var openURL

    var body: some View {
        HStack { /*...*/ }
        .contextMenu {
            Section("Listen on:") {
                // 1
                if let appleMusicURL = mediaItem.appleMusicURL {
                    Button { openURL(appleMusicURL) } label: {
                        Label("Apple Music", systemImage: "arrow.up.right")
                    }
                }
                // 2
                if let spotifyURL = mediaItem.spotifyURL {
                    Button { openURL(spotifyURL) } label: {
                        Label("Spotify", systemImage: "arrow.up.right")
                    }
                }
                if let youtubeURL = mediaItem.youtubeURL {
                    Button { openURL(youtubeURL) } label: {
                        Label("Youtube", systemImage: "arrow.up.right")
                    }
                }
            }
            // 3
            Button(role: .destructive) {
                removeAction()
            }
            label: {
                Label("Remove from My Music", systemImage: "trash")
            }
            // 4
            if let webURL = mediaItem.webURL {
                Divider()
                Button { openURL(webURL) } label: {
                    Label("Share", systemImage: "square.and.arrow.up")
                }
            }
        }
    }
}- If the media item has an Apple Music URL, we add a button to open it.
- By default, the item has only Apple Music URL. We can add Spotify and Youtube URLs via an extension:
import ShazamKit

extension SHMediaItem {

    var youtubeURL: URL? {
        guard let title else {
            return nil
        }
        return URL(string: "https://www.youtube.com/results?search_query=" + title)
    }

    var spotifyURL: URL? {
        guard let title else {
            return nil
        }
        return URL(string: "https://open.spotify.com/search/" + title)
    }
}
These URLs open a related search query in a browser. If an app is installed, the system will open it via an universal link.
- The remove button calls the
removeActionclosure to remove the media item from the library. - The share button opens Shazam web page or app with the media item.
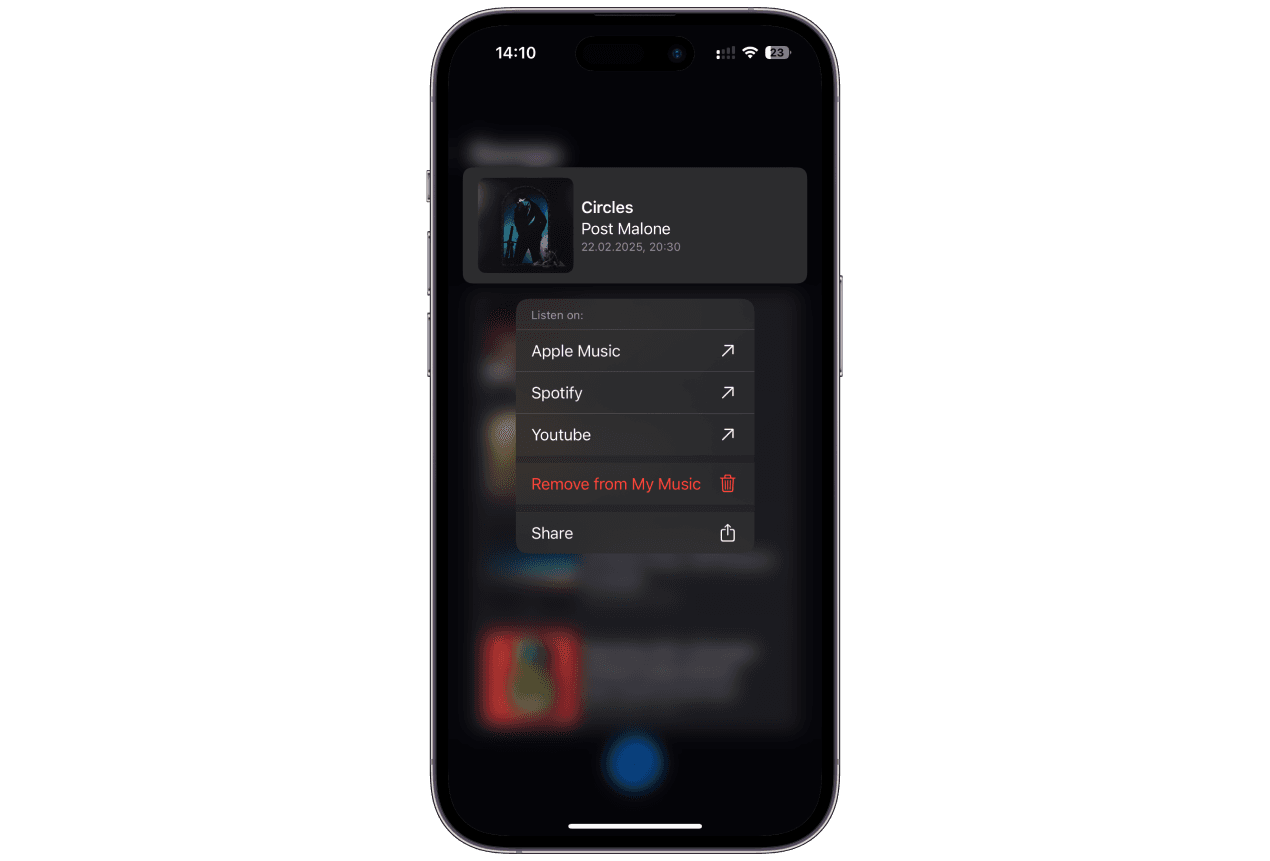
If you long press on the media item, you'll see the context menu:
To remove the media item, we need to update the MediaItemView and ShazamViewModel:
// in ShazamView
MediaItemView(mediaItem: mediaItem) {
    viewModel.remove(mediaItem)
}

// in ShazamViewModel
func remove(_ mediaItem: SHMediaItem) {
    Task { @MainActor in
        try? await library.removeItems([mediaItem])
    }
}
Handling states
Music recognition is a time-consuming process. We need to show the user that the app is working. We can use the managedSession.state to show the current state and disable the button during matching:
private var shazamButton: some View {
    Button(action: match) {
        Image(systemName: "shazam.logo.fill")
            .resizable()
            .frame(width: 52, height: 52)
            .symbolEffect(.pulse, isActive: viewModel.managedSession.state == .matching)
    }
    .allowsHitTesting(viewModel.managedSession.state != .matching)
}
SHManagedSession.State has three states: idle, matching, and prerecording. First two are pretty clear. The last state becomes active when we call prepare() function.
Conclusion
ShazamKit provides a unique opportunity to recognize music in your app. It may be useful for apps with audio content:
- Recognizing songs in podcasts, radio, or user-generated content;
- Applying filters to videos or photos based on background music;
- Creating a music quiz game, etc.
If you want to check the full example, you can find it on GitHub. Thanks for reading!