
Xcode's MCP server lets a coding agent create files, build, render previews, and drive the simulator. Until now, those tools disappeared when you quit Xcode.
Xcode 27 puts external agents behind a setting of their own, External Agent Access, which can keep the tools reachable with the app closed. Combined with Apple's exportable agent skills, it hands an external agent the whole build loop.
Xcode asks about the access on its first launch:
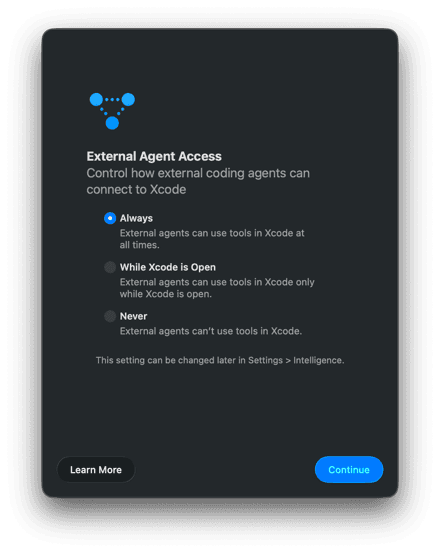
Always is the headless answer: agents reach the tools whether or not Xcode is running. The other two are narrower — While Xcode is Open ties the tools to a running UI, and Never shuts external agents out. The same setting lives in Settings → Intelligence afterwards.
The rest of the post is one app built that way, with Claude Code as the agent and Xcode closed the whole time.
Quit Xcode. We're getting started.
Starting the server without the Xcode UI
You can also turn the access on from the terminal, which is where you'll want
it once Xcode is closed. enable opens the tools up, disable shuts them
again; either way it's an administrator-level change, so every command that
touches permissions needs sudo:
$ sudo xcrun mcp-server enable
mcp-server: enabled (unsafeAlwaysAllowAllAgents: false)
If you already answered Always, this is a no-op, and the service side is
done. It launches on demand the moment an agent connects through the bridge,
whether or not a project exists yet. unsafeAlwaysAllowAllAgents is the one
thing enable lets you change, and false, the default, means every agent
gets approved individually. More on that later.
xcrun mcp-server open <path> exists for when you want to hand the service a
specific workspace ahead of time. It launches the service if it isn't running
and opens the projects you name. Handy in a provisioning script, unnecessary
for an empty repository where the agent creates the project itself.
xcrun mcp-server status reports where things stand:
$ xcrun mcp-server status
Permission: enabled
mcp-server: running
Permission reads the setting back, so this is also how you check where it
stands without opening Xcode.
Wiring the project: MCP server and Apple's skills
Two things have to be in place before Claude Code is any use, and both belong in the project repo rather than in your machine's global config: the server registration, which is how the agent reaches Xcode at all, and Apple's skills, which are how it knows what to do once it gets there.
Registering the MCP server in the repo
The MCP server itself is a stdio bridge:
$ claude mcp add --scope project xcode -- xcrun mcpbridgeEverything after -- is the command the bridge runs, so the flags belong to
claude rather than to xcrun. --scope project writes a .mcp.json at the
repository root. The registration travels with the repository, but every
developer still approves it locally. The resulting file is small enough to
hand-edit later:
{
  "mcpServers": {
    "xcode": {
      "type": "stdio",
      "command": "xcrun",
      "args": ["mcpbridge"],
      "env": {}
    }
  }
}
The bridge connects to the Xcode selected by xcode-select. If you keep
several Xcode installs, add DEVELOPER_DIR to env, pointing at the one you
need, for example /Applications/Xcode-27.app/Contents/Developer. It takes
precedence for the agent without changing the selection for other terminals.
Exporting Apple's skills into the repo
Tools are verbs: build this, render that. Skills tell the agent when to use
them and how Apple expects SwiftUI code to be structured. One command copies
Apple's skills next to .mcp.json:
$ xcrun agent skills export --output-dir "$PWD/.claude/skills"
Launching Xcode...
Exported 10 skills to /Users/artemnovichkov/Developer/ReadingListExample/.claude/skills
  ✓ adopt-c-bounds-safety
  ✓ swiftui-specialist
  ✓ device-interaction
  ✓ swiftui-whats-new-27
  …
The skills ship with Xcode, not with the CLI, so the command launches it and
shows its window — Xcode's only on-screen appearance in this headless
workflow. Existing skills are skipped rather than overwritten, so pass
--replace-existing when you re-export after an update.
Pass --output-dir an absolute path. The export is performed by Xcode
over XPC (Apple's system for communication between processes), not by your
shell, so a relative path resolves against / instead of your project and
fails with a read-only volume error — hence the $PWD above.
Each skill is a plain SKILL.md with name and description frontmatter,
most with a references/ directory of deeper material and occasionally a
scripts/ directory:
Claude Code discovers skills under .claude/skills/ automatically. Discovery
is relative to the directory the agent was started in, so start it in the
project, the same place the server registration lives.
Understanding the permission prompt
The first time an agent uses the server, it has to be approved. The approval is
tied to opening a project: every other tool is refused until the agent calls
XcodeOpenWorkspace or XcodeNewProject. That call blocks, and this prompt
appears:
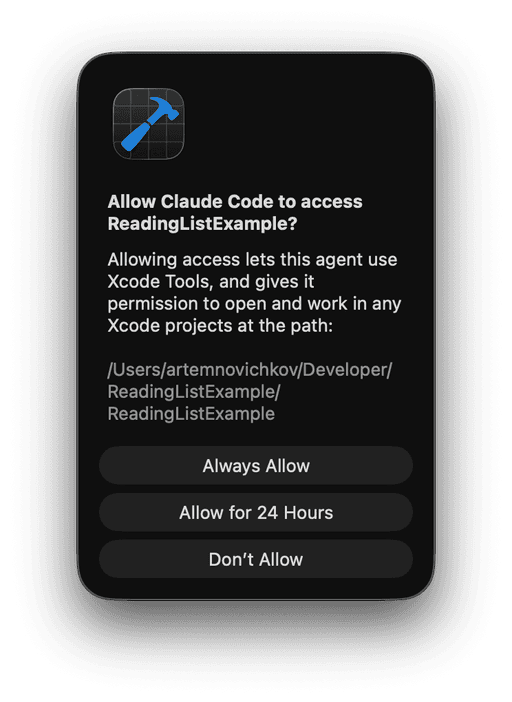
The prompt comes from the headless service, not from Claude Code. Approving it lets the agent use Xcode tools on anything under the path it names (the directory containing the project, recursively). Always Allow keeps the approval, Allow for 24 Hours expires it.
An Xcode icon in the menu bar is the only visible trace of the setup. The service adds it while Xcode itself is closed, and the item is absent whenever the Xcode UI is running. It is a plain hammer with no background until an agent holds a session, and gains a rounded badge while one does. Click it for the service menu:
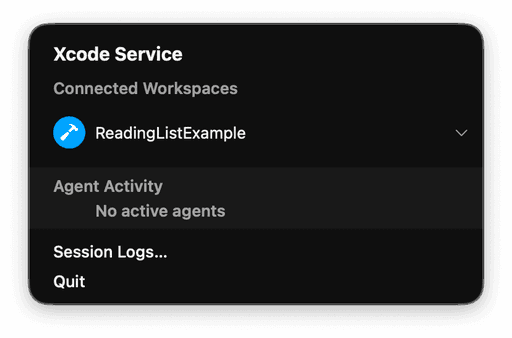
- Connected Projects lists each open project, with the current git branch appended to the name when the checkout is a repository.
- Agent Activity names the connected agents and what each one is doing
right now: a status per in-flight tool call,
BuildingwhileBuildProjectruns, andWorkingwhen nothing more specific applies. - Session Logs… reveals
~/Library/Logs/Xcode/XcodeService/in Finder, the same activity log thatxcrun mcp-server show-logsdumps to a file. - Quit shuts the service down, just like
xcrun mcp-server stop.
status records the result as a signed agent and a permitted folder. This is
how it looks once an agent is working on a project — the one this post builds
further down:
$ xcrun mcp-server status
Permission: enabled
Permitted agents:
  8EC174ED-B917-4104-8358-688464424F0B: signed Q6L2SF6YDW com.anthropic.claude-code
Permitted folders:
  472C100D-96D4-44FE-81D3-FA27F11E2433: /Users/artemnovichkov/Developer/ReadingListExample/ReadingListExample
mcp-server: running
Open workspaces:
  - ReadingListExample — /Users/artemnovichkov/Developer/ReadingListExample/ReadingListExample/ReadingListExample.xcodeproj (scheme: ReadingListExample)
Skipping the prompts
One unsafe flag skips the prompt entirely:
sudo xcrun mcp-server enable --unsafe-always-allow-all-agentsThe permission mode shows in the badge color: blue for individual approvals, yellow for unsafe mode. Yellow means the service trusts every agent on the machine. The color marks the mode; the badge itself comes and goes with the session.

From left: no agent connected, individual approvals, and unsafe mode.
The flag is named after agents, but it covers the folder grant too. It trusts
every process on the machine with every Xcode project it can reach, leaving no
individual grant in status to revoke. Disable and re-enable the service
without the flag to return to individual prompts. To remove any stored grants,
run:
sudo xcrun mcp-server clear-permissionsThe next connection asks for approval again. reset-all goes further: it
deletes every stored permission, kills the running service immediately, and
brings the first-run onboarding back.
sudo xcrun mcp-server reset-allThe shortcut that isn't headless
Xcode can also launch the agent for you, with no registration and no
.mcp.json anywhere:
$ xcrun agent claude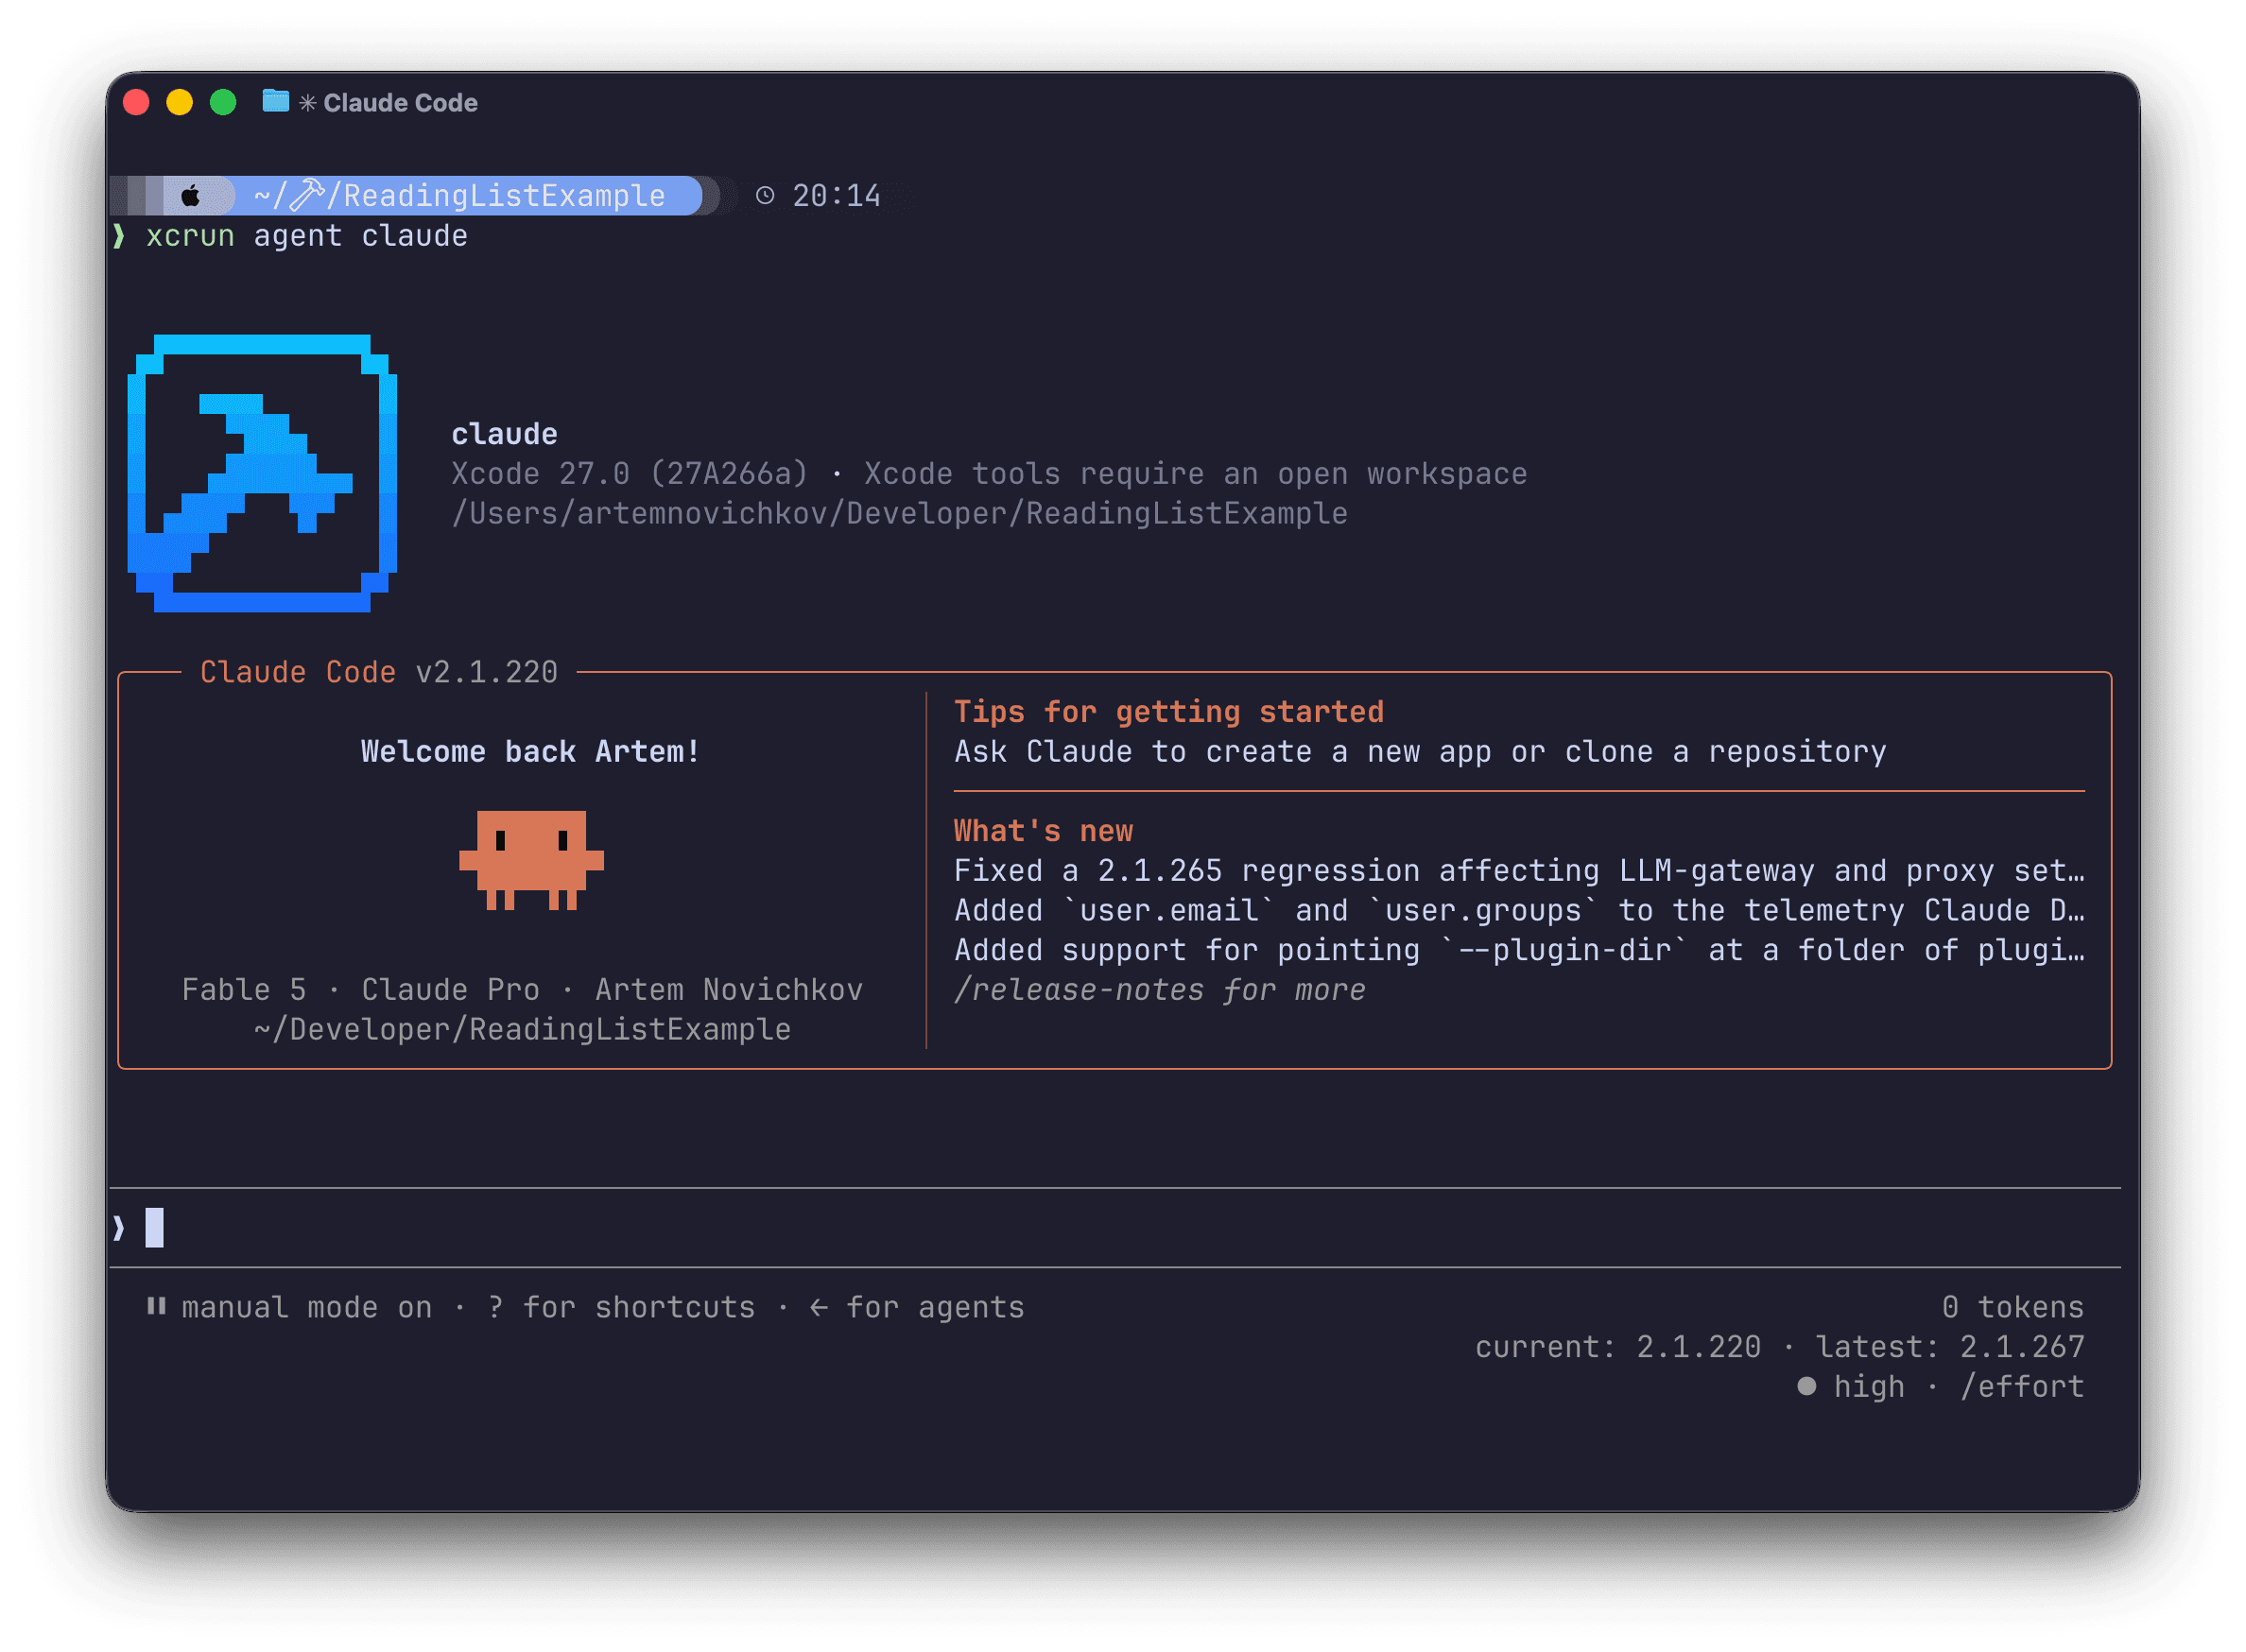
It's the fastest way to see the tools work. But it trades away most of what the rest of this post is about.
It opens Xcode. The command pins the agent to a full Xcode instance through
MCP_XCODE_PID and launches the UI if it isn't already running. You get the
window back, and with it the focus stealing that headless mode exists to avoid.
The pinned Xcode needs a project open. The banner says so: Xcode tools
require an open workspace. An Xcode with nothing open refuses to enumerate its
tools at all, and the agent shows the server as connected with tools fetch failed. Open a project in that window and they appear. The headless service
lists its tools whether or not a workspace is open, which is why the empty
repository below works.
It runs Xcode's copy of the agent, not yours. The executable comes from
~/Library/Developer/Xcode/CodingAssistant/Agents/XcodeVersions/<build>/, so
you get whatever version Xcode shipped with instead of the one on your PATH.
CLAUDE_CONFIG_DIR is redirected as well, which leaves your settings, plugins,
and session history out of the picture.
Nothing ends up in the repository. A teammate who clones gets no server registration, so the setup isn't reproducible for anyone but you.
Use it to kick the tires. For everything below, I run plain claude (my own
version, my own settings) against the checked-in .mcp.json, with Xcode
closed.
Creating the project from a prompt
With the setup complete, describe the project:
Create a new multiplatform SwiftUI app called ReadingListExample in a subfolder, no storage, Swift Testing.
The agent discovers what the templates offer instead of guessing at
identifiers. The XcodeListTemplates tool with kind: "project" browses them,
and browsing is deliberately cheap: every options array comes back empty,
with the response pointing at a fullTemplateListPath on disk and telling the
agent to narrow the query. Passing a filter or a templateIdentifier returns
the real option schema. For the standard App template that is productName,
bundleIdentifierPrefix, storageType, hostInCloudKit, and testingSystem.
Then the XcodeNewProject tool instantiates it:
{
  "templateIdentifier": "com.apple.dt.unit.multiPlatform.app",
  "productName": "ReadingListExample",
  "destinationPath": "/Users/artemnovichkov/Developer/ReadingListExample",
  "options": { "storageType": "None", "testingSystem": "Swift Testing" }
}
That JSON is the tool call, not something you write. Claude Code collapses tool calls to a one-line summary; ⌃ + O shows the parameters and response.
destinationPath is the parent directory. Asking for a subfolder keeps
.mcp.json and the skills at the repository root while Xcode creates
<productName>/ beneath it. The XcodeNewProject tool writes the project to
disk; the XcodeOpenWorkspace tool then opens the generated .xcodeproj and
returns the workspace identifier used by subsequent tools.
Generating the app with Apple's SwiftUI skill
The app is deliberately small: a list of books grouped into Currently Reading and Finished, a detail screen, and a sheet for adding a book.
Build the reading list screen. A
Bookmodel with title, author, page count, current page and a reading/finished status. An@Observablestore that holds a loading/loaded/failed state and exposes the two sections. AListgrouped into Currently Reading and Finished, pushing to a detail screen with a "Mark as Finished" button, plus a sheet for adding a book. Log every mutation withOSLogunder theReadingListcategory.
Logging each mutation lets the simulator run verify the underlying state changes, not only the visible UI.
The generated project keeps the model, store, views, and logging extension in separate files:
Claude loaded swiftui-specialist and its data-flow and structure references
before editing. The generated store caches both sections and recomputes them
after mutations, while rows and sections remain separate views.
The BuildProject tool then verifies the generated project:
{
  "buildResult": "The project built successfully.",
  "elapsedTime": 1.037,
  "errors": [],
  "fullLogPath": "/var/folders/.../BuildProject/BuildProject-Log-20260910-183100.txt"
}
Rendering previews without a Canvas
The RenderPreview tool builds a preview and returns the rendered PNG without
opening the Canvas.
Combine the previews in
ReadingListView.swiftinto one#Preview(arguments:)with all four states — loading, empty, loaded, failed — and give each a readable name. Then render every variant and look at the PNGs.
The four states end up in a single
#Preview(arguments:),
one variant per case:
#Preview("Reading List", arguments: ReadingListPreviewState.allCases) { previewState in
    ReadingListPreview(previewState: previewState)
}
Then the agent renders each variant, opens the resulting PNGs, and checks their
contents. The RenderPreview tool returns file paths, so ask the agent to
inspect the images rather than only confirm that rendering succeeded.
Comparing four separate PNGs is cumbersome, so ask Claude to publish them as a single HTML artifact:
Publish the renders as an artifact, one card per state.
An artifact is a standalone HTML page that Claude generates from the rendered files. Here it embeds each PNG in a labeled card, arranges the four states in a grid, and adds context such as the device, OS version, and appearance. You open and share one page instead of four temporary files.
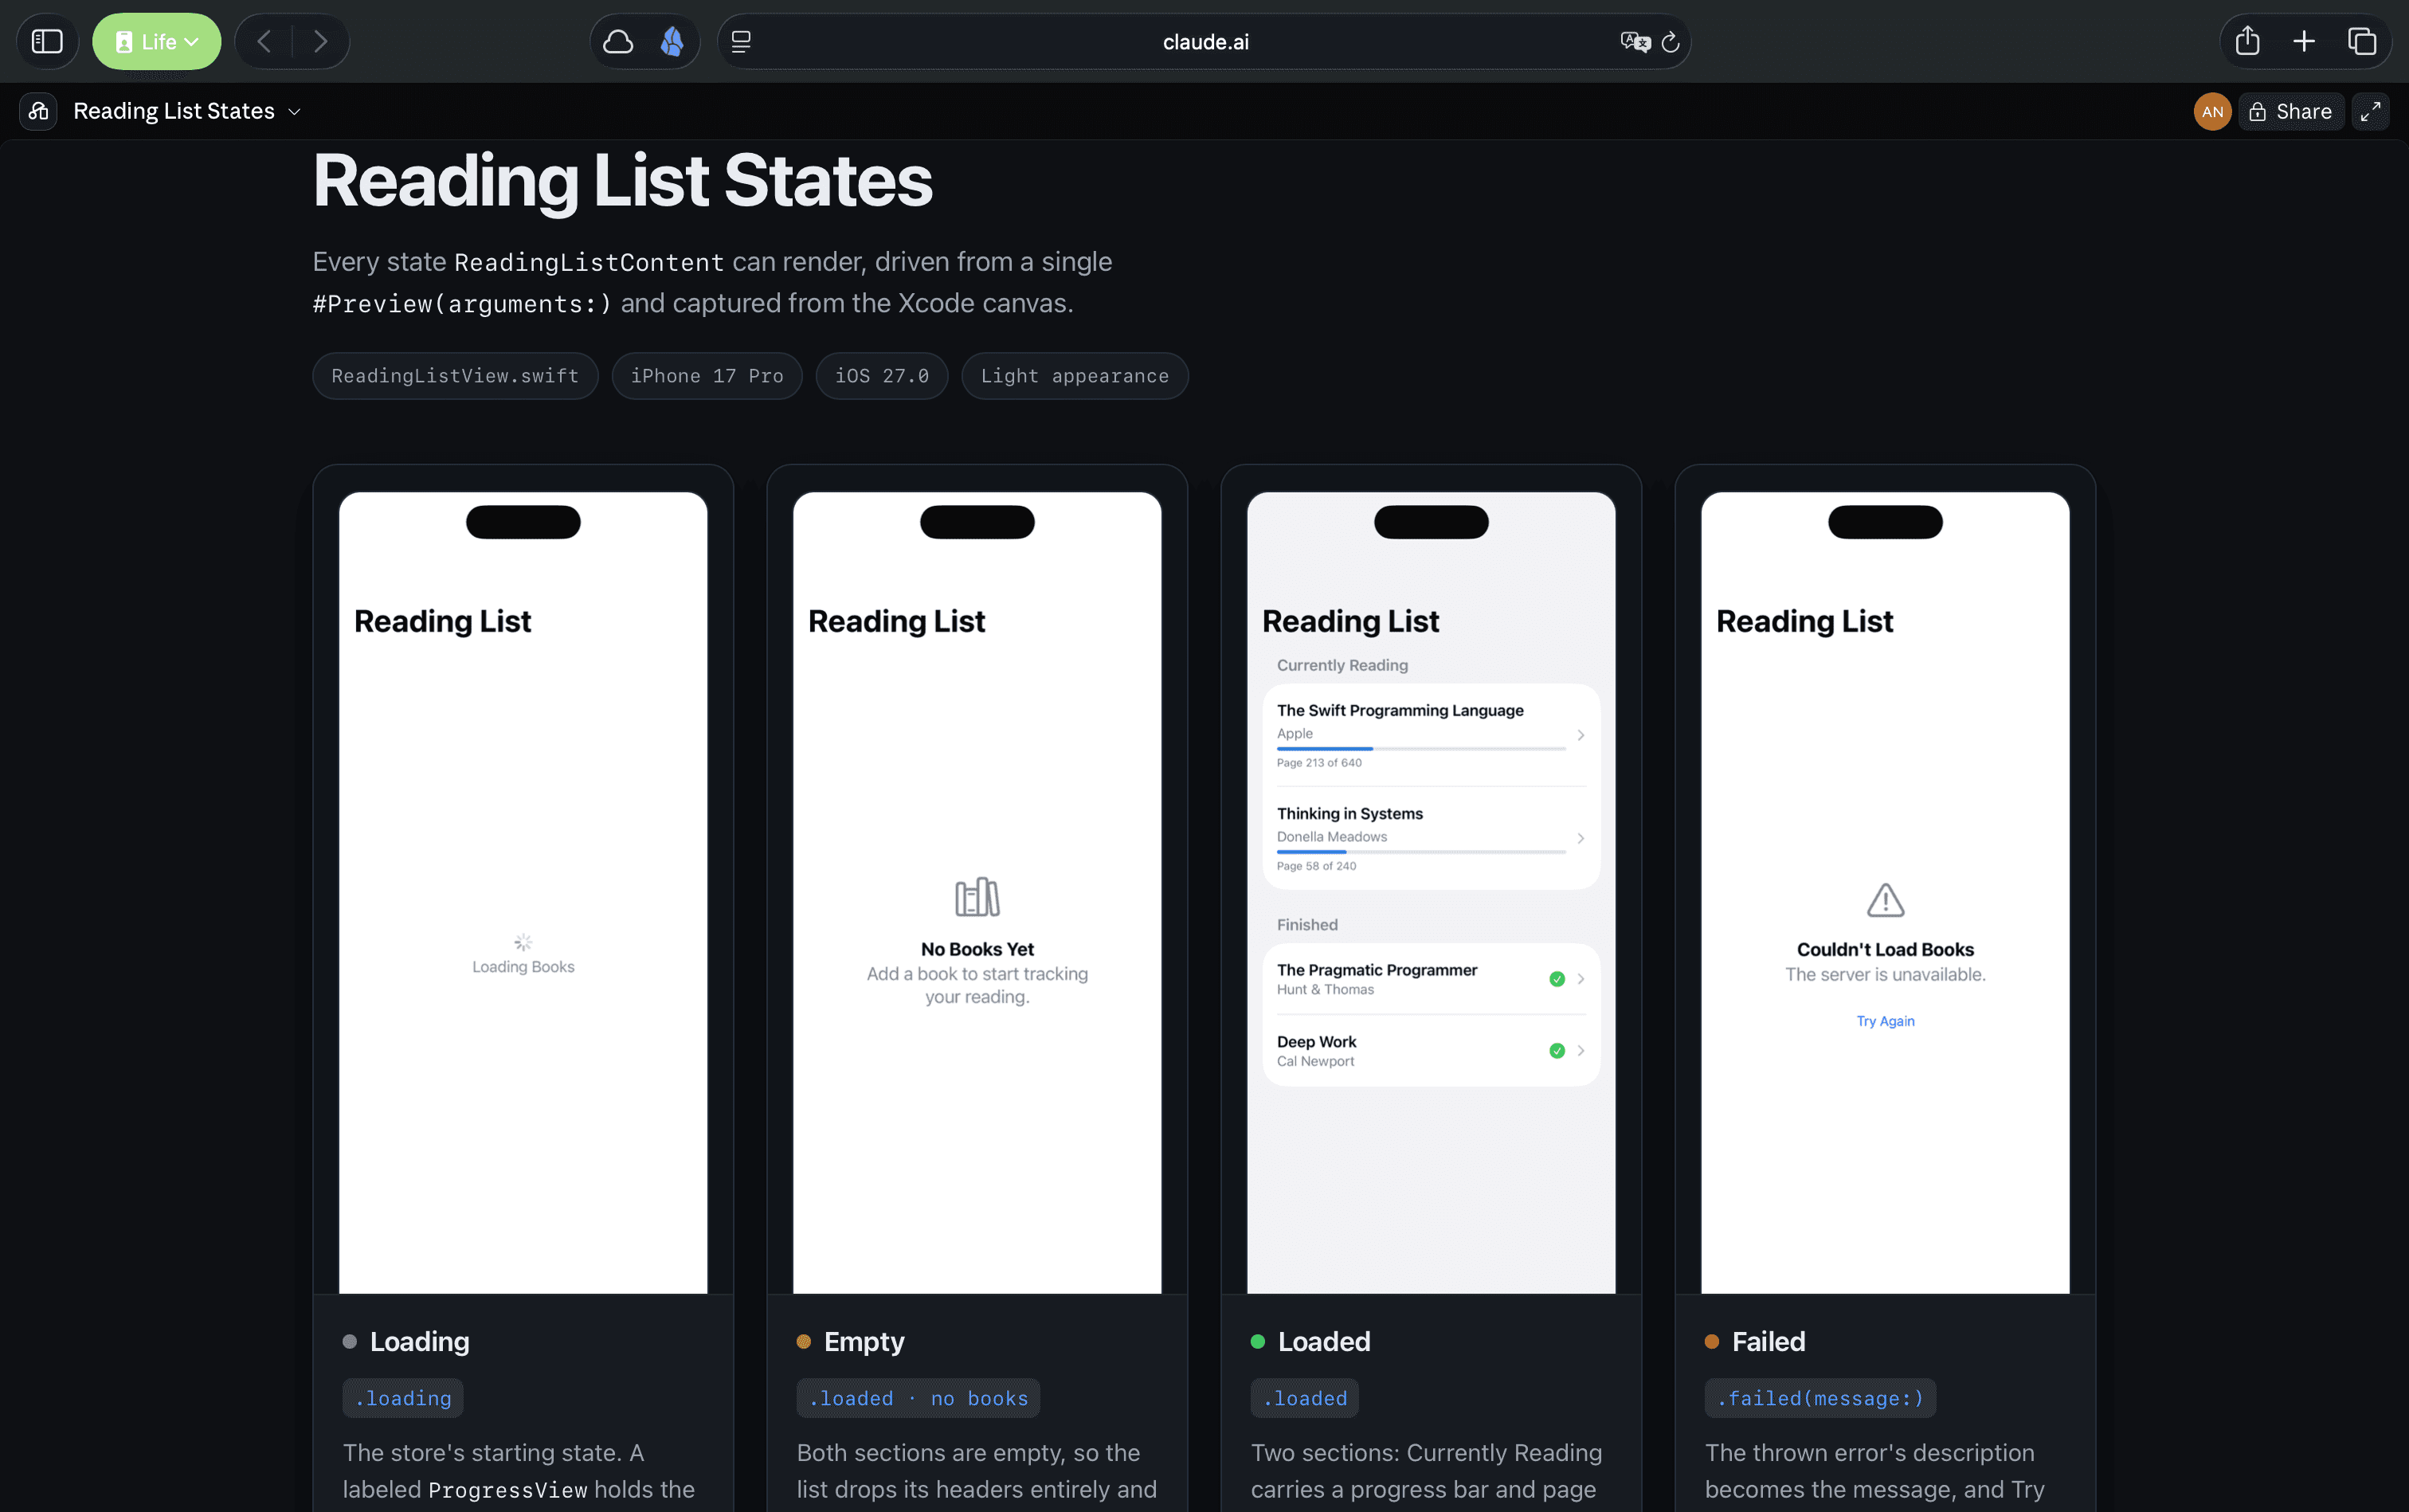
Side by side, they reveal details a single snapshot hides: spacing that drifts between states, a title that sits differently, or a message that wraps.
Verifying a full app flow on the simulator
Previews show individual screens and states, but they don't cover navigation, text input, or how changes propagate across the app. Running the app on a simulator lets the agent verify these interactions as one continuous flow.
The prompt is the sentence you'd say to a colleague, with no coordinates, tool names, or mention of booting a simulator:
Run the app on the iPhone 17 Pro simulator and check that finishing a book moves it out of Currently Reading. Then add a book and confirm it shows up.
The agent opens an interaction session, boots a simulator through MCP, then builds, installs, and launches the app, without anyone clicking around the Simulator UI.
Every capture returns a PNG and the accessibility hierarchy, including each element's label, frame, and a precomputed point to tap. The agent uses this data to find controls and interact with them instead of guessing coordinates. These tools rely on the app's accessibility metadata, so clear labels benefit both automation and VoiceOver users.
Here is the PNG returned for one capture:
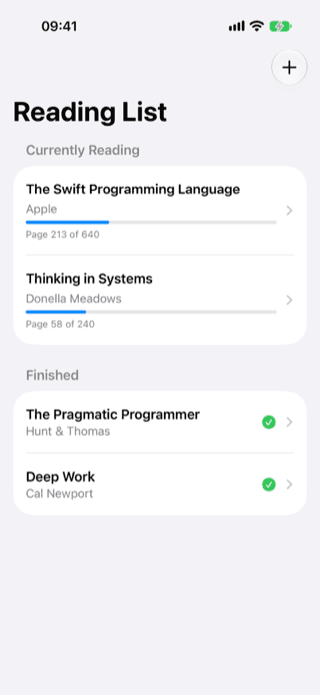
The matching accessibility hierarchy included entries like these:
Button
  frame: {{346.0, 66.0}, {36.0, 36.0}}
  label: "Add Book"
  hitPoint: {364.0, 84.0}

Button
  frame: {{16.0, 208.3}, {370.0, 112.7}}
  label: "The Swift Programming Language, Apple, Page 213 of 640"
  value: 33%
  hitPoint: {201.0, 264.7}
The output is reformatted here for readability. The frame is written as
{{x, y}, {width, height}}, while label and value describe what is on
screen. hitPoint gives the agent a reliable coordinate for the next action:
the second entry becomes t 201.0 264.7.
Interactions are a small command language chained into one call. Tap, wait, type, swipe, press a hardware button:
t 113.8 384.2 w 0.5 t 38 84
t 201 198.3 w 0.4 sender keyboard kbd The Design of Everyday Things
Here t x y taps, w waits, and sender keyboard kbd types everything that
follows. Swipe and hardware-button commands can be chained in the same call.
The device-interaction skill documents this syntax and helps the agent turn
the accessibility output into reliable actions.
In this loop the agent opens a book, marks it as finished, returns to the list, opens the add-book sheet, enters the details, and submits the form. A final capture shows the result of the complete flow:
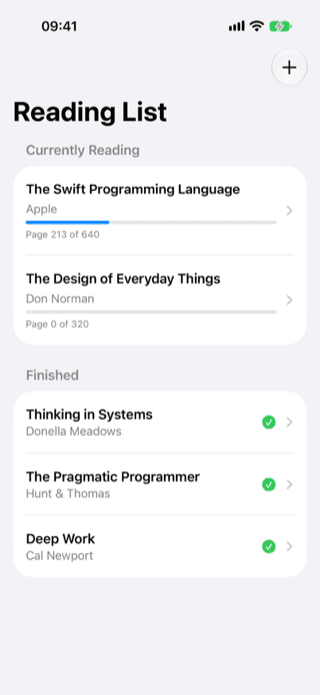
The screenshot confirms the visible result, while OSLog confirms the
underlying state changes:
[ReadingList] Loaded 4 books
[ReadingList] Marked book 5CB30AD5-71D0-4A2A-8395-C557340904AA 'Thinking in Systems' as finished
[ReadingList] Added book D01C2C79-5ECB-45EE-B8E7-...
Closing the interaction session releases the simulator and its debug connection.
What headless costs you
Headless mode removes Xcode's visual debugging UI, not the debugger itself. You
lose the Canvas with its live selection, the view debugger, the breakpoint
gutter, and Organizer. Breakpoints still work through LLDB, but they are not
visible in an editor. The RenderPreview tool gives you a PNG per variant
instead of an interactive Canvas.
Builds, previews, tests, simulator runs, and console output remain available through tools. That covers most of an agent's build loop without a window stealing focus every time it renders something. You can still open the same project in Xcode whenever you need its visual tools.
Optional: inspecting the stored permissions
You don't need the implementation details below to use the server. They are useful when auditing or scripting the setup, but the location and schema are undocumented internals and may change.
The headless setting and both kinds of grant are reflected in a JSON file inside Xcode's group container:
~/Library/Group Containers/group.com.apple.dt.Xcode.SecureSettingsContainer/CodingAssistant/HeadlessPermissions/mcp-server.jsonThe file is one line on disk, formatted here for readability:
{
  "agentPermissions": [
    {
      "id": "8EC174ED-B917-4104-8358-688464424F0B",
      "trust": {
        "signed": {
          "signingIdentifier": "com.anthropic.claude-code",
          "teamIdentifier": "Q6L2SF6YDW"
        }
      }
    }
  ],
  "enabled": true,
  "folderPermissions": [
    {
      "id": "472C100D-96D4-44FE-81D3-FA27F11E2433",
      "subtreeRoot": "/Users/artemnovichkov/Developer/ReadingListExample/ReadingListExample"
    }
  ],
  "onboardingWatermark": 1,
  "version": 1
}
Read it, but don't edit it: the service rewrites the file on every change. For
scripts, status --format json is the better source because it also reports
runtime state:
{
  "openWorkspaces" : [
    {
      "activeSchemeName" : "ReadingListExample",
      "displayName" : "ReadingListExample",
      "path" : "/Users/artemnovichkov/Developer/ReadingListExample/ReadingListExample/ReadingListExample.xcodeproj"
    }
  ],
  "permission" : {
    "enabled" : true,
    "permittedAgents" : [
      {
        "id" : "8EC174ED-B917-4104-8358-688464424F0B",
        "trust" : {
          "signed" : {
            "signingIdentifier" : "com.anthropic.claude-code",
            "teamIdentifier" : "Q6L2SF6YDW"
          }
        }
      }
    ],
    "permittedFolders" : [
      {
        "id" : "472C100D-96D4-44FE-81D3-FA27F11E2433",
        "subtreeRoot" : "/Users/artemnovichkov/Developer/ReadingListExample/ReadingListExample"
      }
    ],
    "unsafeAlwaysAllowAllAgents" : false
  },
  "running" : true
}
The JSON format makes the unsafe-mode flag, the agent trust data, and the active scheme of each open workspace easier to inspect from scripts. A provisioning script can use them to verify the expected team identifier before a build.
Where the code lives
The complete app, including the exported skills under .claude/skills/, is in
the
ReadingListExample
repository. My
Xcode Tools documentation
covers the individual MCP tools in more detail.