Sponsored
Glaze by Raycast
Desktop apps, reimagined by you. Create software for you and your team — it lives on your Mac and connects to your files, tools, and hardware.
Learn More →Telegram has a spoiler feature that allows you to hide certain parts of your message that could reveal a spoiler. In this article, we will explore how to implement the feature in SwiftUI.
Dive into source code
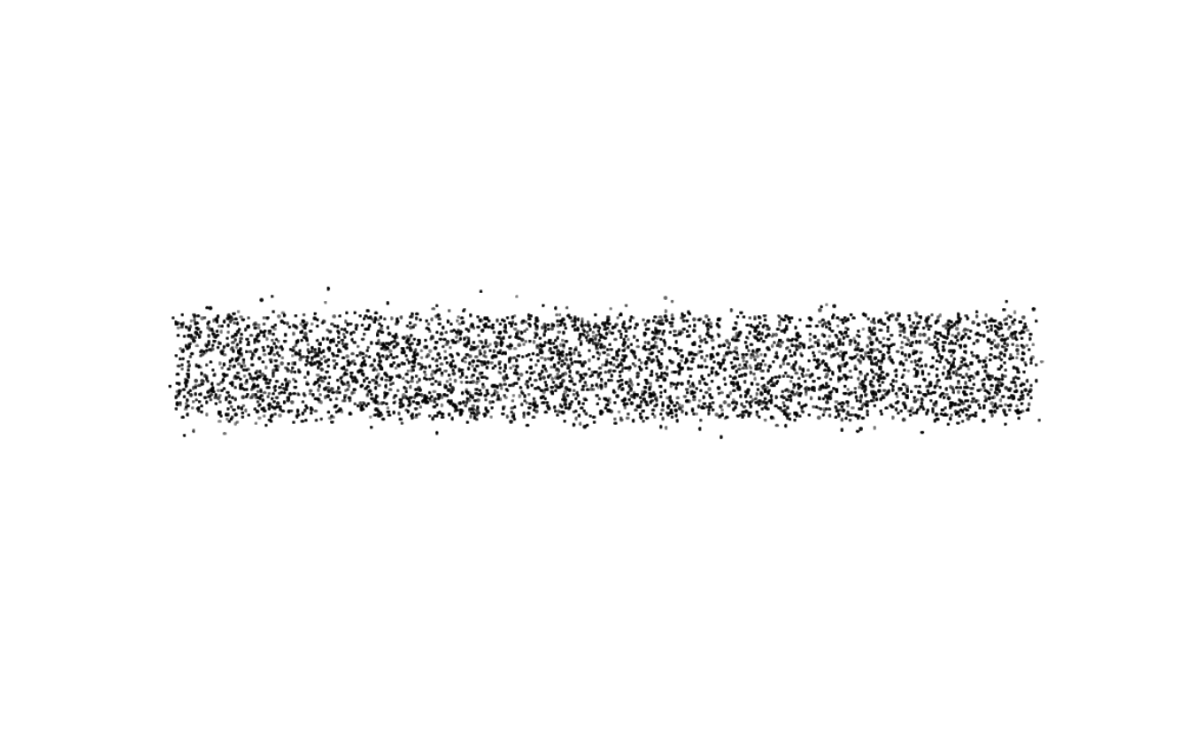
If you're interested in exploring Telegram's source code, you'll find that they use the CAEmitterLayer and CAEmitterCell classes from Core Animation to implement the spoiler effect. CAEmitterLayer is a powerful class that allows you to create particle effects like fire, smoke, or snow. In the case of the Telegram spoiler effect, CAEmitterLayer is used to generate a cloud of particles that obscure the spoiler text:
let emitter = CAEmitterCell()
emitter.contents = UIImage(bundleImageName: "Components/TextSpeckle")?.cgImage
emitter.contentsScale = 1.8
emitter.emissionRange = .pi * 2.0
emitter.lifetime = 1.0
emitter.scale = 0.5
emitter.velocityRange = 20.0
emitter.name = "dustCell"
emitter.alphaRange = 1.0
emitter.setValue("point", forKey: "particleType")
emitter.setValue(3.0, forKey: "mass")
emitter.setValue(2.0, forKey: "massRange")
We will reuse their configuration, but in final, we want to see something like this:
import SwiftUI

struct ContentView: View {

    @State var spoilerIsOn = true

    var body: some View {
        Text("Everything will be good")
            .font(.title)
            .spoiler(isOn: $spoilerIsOn)
    }
}
CAEmitterLayer in SwiftUI
We can create a custom UIView subclass that's designed specifically to work with CAEmitterLayer:
final class EmitterView: UIView {

    override class var layerClass: AnyClass {
        CAEmitterLayer.self
    }

    override var layer: CAEmitterLayer {
        super.layer as! CAEmitterLayer
    }

    override func layoutSubviews() {
        super.layoutSubviews()
        layer.emitterPosition = .init(x: bounds.size.width / 2,
                                      y: bounds.size.height / 2)
        layer.emitterSize = bounds.size
    }
}
We override the layerClass property to specify that the layer for this view should be of type CAEmitterLayer. We also override the layer property to cast the super.layer as a CAEmitterLayer, which allows us to access the emitter layer's properties and methods more easily.
Pay attention to layoutSubviews() function. It's required to set position and size for the emitter.
Next, we'll use UIViewRepresentable wrapper and add emitter cell configurations:
struct SpoilerView: UIViewRepresentable {

    var isOn: Bool

    func makeUIView(context: Context) -> EmitterView {
        let emitterView = EmitterView()

        let emitterCell = CAEmitterCell()
        emitterCell.contents = UIImage(named: "textSpeckle_Normal")?.cgImage
        emitterCell.color = UIColor.black.cgColor
        emitterCell.contentsScale = 1.8
        emitterCell.emissionRange = .pi * 2
        emitterCell.lifetime = 1
        emitterCell.scale = 0.5
        emitterCell.velocityRange = 20
        emitterCell.alphaRange = 1
        emitterCell.birthRate = 4000

        emitterView.layer.emitterShape = .rectangle
        emitterView.layer.emitterCells = [emitterCell]

        return emitterView
    }

    func updateUIView(_ uiView: EmitterView, context: Context) {
        if isOn {
            uiView.layer.beginTime = CACurrentMediaTime()
        }
        uiView.layer.birthRate = isOn ? 1 : 0
    }
}
The isOn property in SpoilerView is used to change visibility of the particle effect via birthRate property. textSpeckle_Normal image is reused from Telegram, it's a simple white dot, we can use any image for particles or generate it in runtime. And of course, we can move all constants to the properties as well, but we hardcode it to simplify the example.
Modifiers and extensions
We implement a SpoilerModifier struct that adds a spoiler to any view. It takes a boolean value to toggle the visibility of the effect.
struct SpoilerModifier: ViewModifier {

    let isOn: Bool

    func body(content: Content) -> some View {
        content.overlay {
            SpoilerView(isOn: isOn)
        }
    }
}
We already can use it like a usual modifier:
import SwiftUI

struct ContentView: View {

    var body: some View {
        Text("Everything will be good")
            .font(.title)
            .opacity(0)
            .modifier(SpoilerModifier(isOn: true))
    }
}
Or we can expend View protocol and add some useful modifiers:
extension View {

    func spoiler(isOn: Binding<Bool>) -> some View {
        self
            // 1
            .opacity(isOn.wrappedValue ? 0 : 1)
            // 2
            .modifier(SpoilerModifier(isOn: isOn.wrappedValue))
            // 3
            .animation(.default, value: isOn.wrappedValue)
            // 4
            .onTapGesture {
                isOn.wrappedValue.toggle()
            }
    }
}
Let's discover every line here:
- Hides the content if the spoiler is on.
- Adds the modifier with the spoiler modifier.
- Adds a default animation for smooth transitions between states. The type of the animation we also can pass via parameters to change it from the outside.
- Add a tap gesture to change the states.
Now we can apply these modifiers to any view in our apps. It doesn't work exactly like in Telegram, because it should overlay every word separately and hide the particles starting from the tap area. According to Text interface in SwiftUI and initial tricky implementation (hello, private API), this solution is simple and useful for rectangles like one-line text or images. If you know how to improve it, feel free to ping me on Twitter.
If you want to play with SpoilerView by yourself, check out SpoilerViewExample project on Github.